Raspberry Pi Fuego Setup
This is a list of instructions for setting up a Raspberry Pi board for use with Fuego. These instructions will help you set up the ssh server, used by Fuego to communicate with the board, and the test directory on the machine, that Fuego will use to store programs and files during a test.
These instructions and the screen shots are for a Raspberry Pi Model 3 B, running “Raspbian 9 (stretch)”.
This assumes that the Raspberry Pi is already installed, and that networking is already configured and running.
Obtain your network address
First, determine what your Pi’s network address is. You can see this by using the command ‘ifconfig’ in a terminal window, and checking for the ‘inet’ address.
Or, move your mouse cursor over the network icon in the desktop panel bar. If you leave the mouse there for a second or two, a box will appear showing information about your current network connection.
This is what the network information box looks like (in the upper right corner of this screen shot):
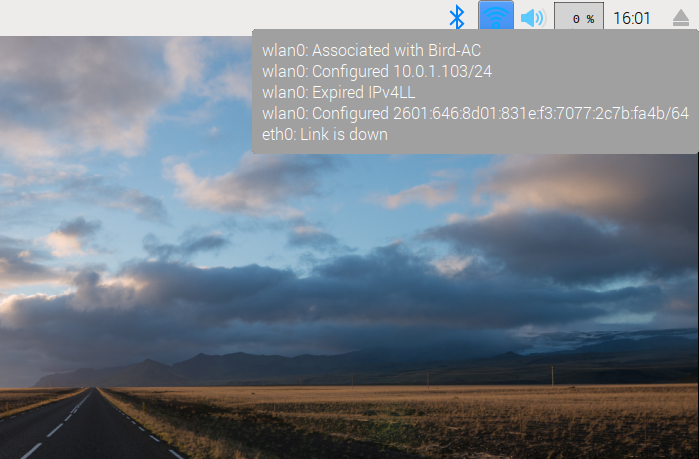
In this case, my network address is 10.0.1.103. Your address might start with 192.168, which is common for home or local networks.
Note this address for use later.
Configure the SSH server
In order for other machines to access the Pi remotely, you need to enable the ssh server.
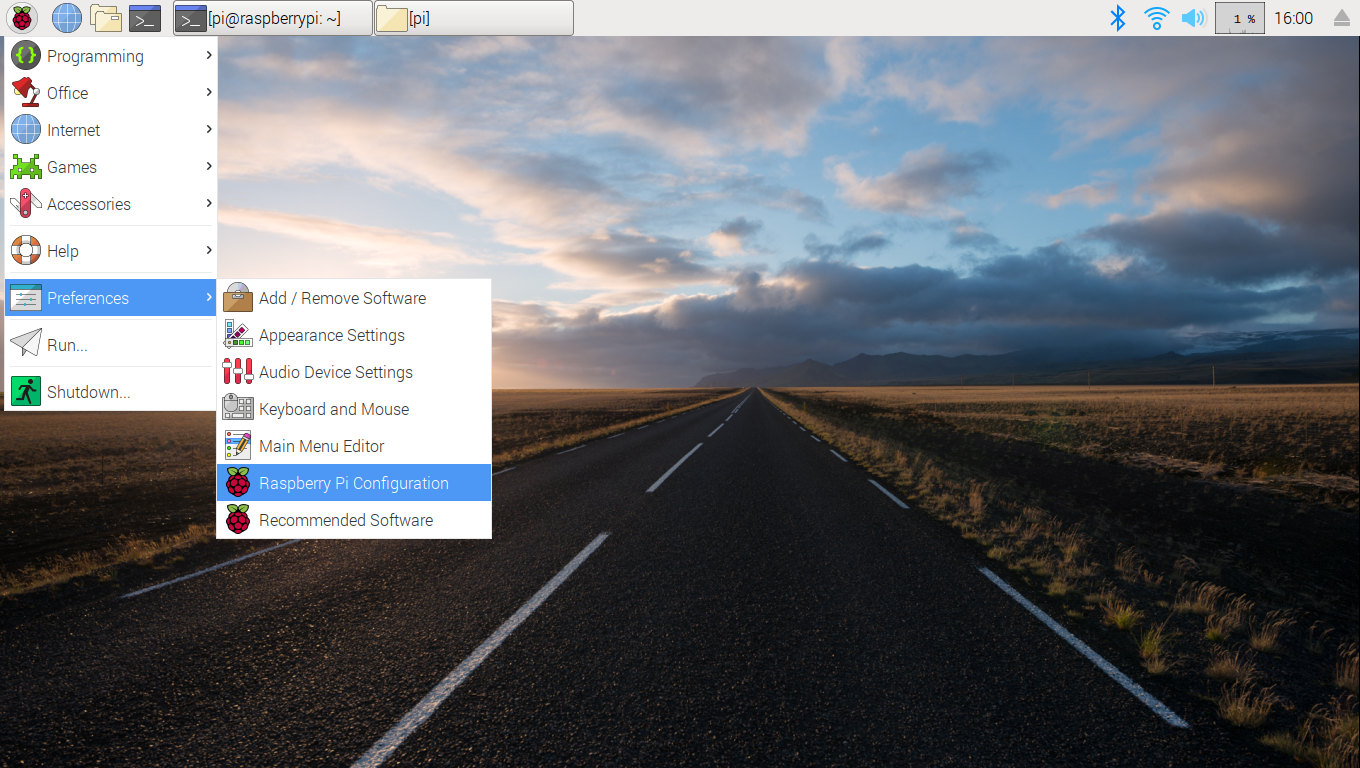
This is done by enabling the SSH interface in the Raspberry Pi Configuration dialog.
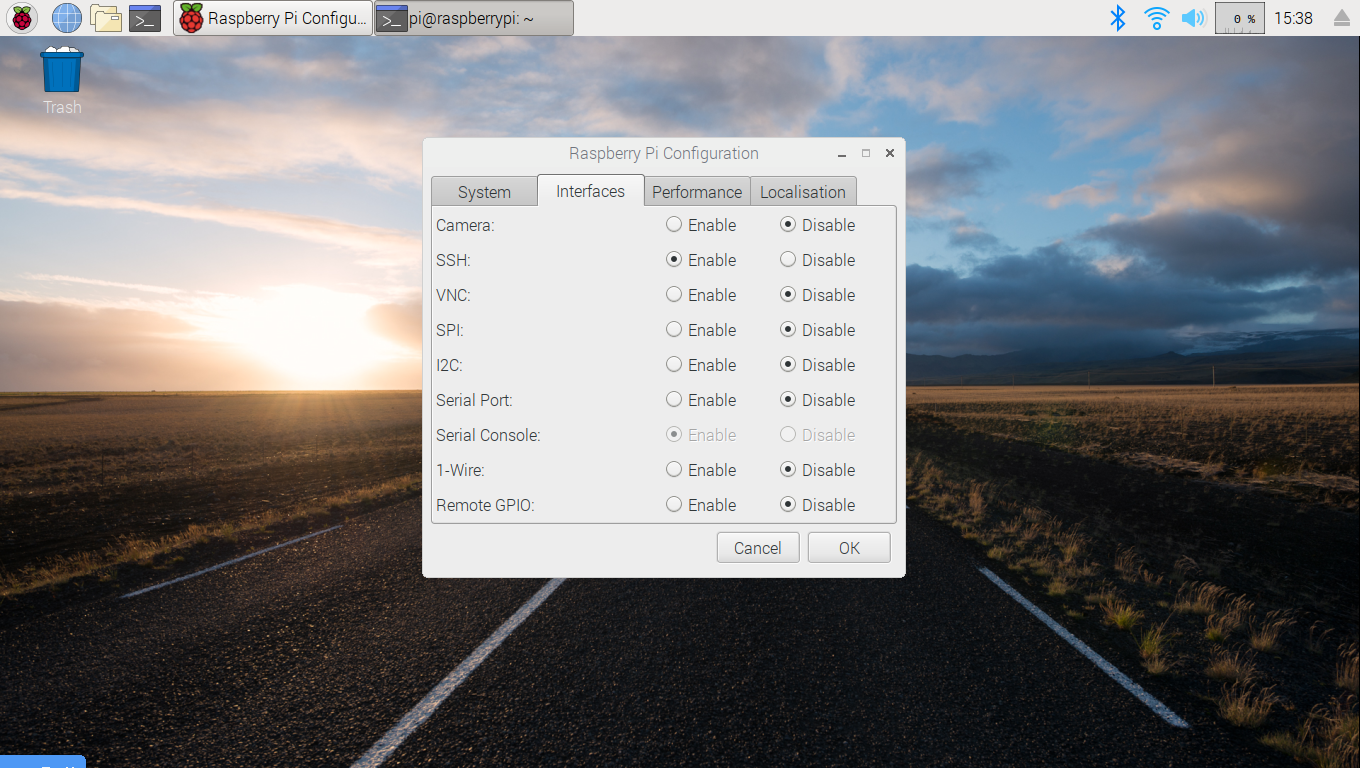
To access this dialog, click on the raspberry logo in the upper right corner of the main desktop window. Then click on “Preferences”, then on “Raspberry Pi Configuration”. In the dialog that appears, click on the “Interfaces” tab, and on the list of interfaces click on the “Enable” radio button for the SSH interface.
Here is the menu:
The configuration dialog looks something like this:
Try connecting
Now, close this dialog, and make sure you can access the Pi using SSH from your host machine.
Try the following command, from your host machine:
ssh pi@<’’your_address’’>
You will be asked for the password for the ‘pi’ user account.
If you successfully log in, you will be at a shell prompt.
Configure sshd for root access (if applicable)
If you intend to execute Fuego tests as root, you should configure the SSH server to permit root login.
This is not recommended on machines that are in production, as it is a significant security risk. However, for test machines it may be acceptable to allow root access over ssh.
To do this, on the Raspberry Pi, with root permissions, edit the file /etc/ssh/sshd_config and add the following line:
PermitRootLogin yes
Note
You need to stop and start the ssh server, or reboot the board, in order to have this new configuration take effect.’’
Make a test directory
You can use any directory you like for executing tests from Fuego. However, we recommend using the ‘/home/fuego’ directory. These instructions indicate how to create that directory.
If you are using root as your test user account, then create a directory on the Raspberry Pi for test programs and files.
If logged in as the ‘pi’ account, then switch to root (using something like ‘sudo su’), and type, at a shell prompt:
$ mkdir /home/fuego
If you do not wish to use the root account for testing, then you should create a ‘fuego’ account for testing. To do this, use the ‘adduser’ program. You will be prompted for some information.
$ adduser fuego
Answer the questions, including setting the password for this account. Remember the password you select, and use that in the board file when configuring Fuego to access this board.
This will create the directory /home/fuego.
The directory /home/fuego is what should be used in
the board file when configuring Fuego to operate with this board.
Add the board file to Fuego
Now that you have set up the Raspberry Pi board, add the board file to Fuego. Assuming your IP address is 10.0.1.17, and you wish to log in as root, you would create a board file called “rpi.board”, and located at
<fuego-top-dir>/fuego-ro/boards/rpi.board
with the following contents:
inherit "base-board"
include "base-params"

IPADDR="10.0.1.17"
LOGIN="root"
BOARD_TESTDIR="/home/fuego"
PASSWORD="put-the-root-password-here"
TOOLCHAIN="debian-armhf"
TRANSPORT="ssh"
ARCHITECTURE="arm"
FUEGO_TARGET_TMP="/home/fuego"
Note
Of course, use the correct root password for your board
Add the toolchain to Fuego
The Raspbery Pi board is an ARM 32-bit platform.
Add the ‘debian-armhf’ toolchain to the Fuego docker container, using the helper script in the fuego-ro/toolchains directory.
Inside the Fuego container, run:
$ /fuego-ro/toolchains/install_cross_toolchain.sh armhf
Add a node and jobs for the board
Inside the Fuego container, run:
$ ftc add-node -b rpi
Add the tests you want to run, as Jenkins jobs. You should always add the “fuego_board_check” test, as a way to automatically determine that status of a board.
Inside the Fuego container, run:
$ ftc add-job -b rpi -t Functional.fuego_board_check
An easy way to populate Jenkins with a set of tests is to install a batch test.
Install the “smoketest” batch test, as follows:
Inside the Fuego container, run:
$ ftc add-jobs -b rpi -t Functional.batch_smoketest
Run a board check
To see if everything is set up correctly, execute the test: Functional.fuego_board_check.
In the Jenkins interface, select “rpi.default.Functional.fuego_board_check” and select the menu item “Build Now” on the left hand side of the screen.
Wait a few moments for the test to complete. when the test completes, check the log for the test by clicking on the link to the ‘testlog’.